A framed photo is a timeless, personal gift: you’re giving the recipient something you know they will appreciate, whether it’s a photo of someone they love, artwork you specifically selected, or even an empty frame to enclose a recently earned diploma.
Make the gift even more personal with your own special flair, commemorating the occasion and giving them a memento to treasure for years to come.
Write a Secret Message
Many times, you’ll include a handwritten card that expresses your congratulations, gratitude or well wishes. Instead, write these personal sentiments directly onto the backing board or dust cover, resulting in a hidden message that remains a special secret between you and your loved one.
With Frame Destination picture frames, the back of the frame is most often the backside of the mounting board, also called backing board. You can write on this with any type of pen or marker, but it is wise to ensure that the ink does not bleed or show through.
If you are writing on the dust cover, which is located at the back of the frame and protects the frame contents, make sure that you either write the message before you attach the dust cover or, if it’s already attached, use a very light touch. Dust covers are not thick, as they’re a functional part of the frame that’s not meant for display; if you use a particularly sharp pen or push too hard, you may tear it.
Write on the Mat Board
Dust covers are not meant to last forever, and a mounting board may be replaced — if your message is particularly important, you can put it on display. If you’re planning on writing on mat board, use a pen that won’t fade. Pigment ink pens are a much better choice than dye ink pens, so do not use a ballpoint or fountain pen. Look for gel pens or any other pen that’s labeled “pigment ink,” such as Pigma Micron.
Before writing on the mat board you’ll use for the frame, make sure that you plan out your message as well as the spacing, placement and size beforehand. Practice writing it a few times so that you’re sure you won’t make a mistake. If you do, however, don’t worry: you can always order another mat board cut to size.
Paint the Frame
Take your personalized picture frame gift to the next level and make it DIY project with paint. You can let your imagination run wild:
- Paint a message or phrase
- Use painter’s tape for geometric patterns
- Paint with dots to create intricate designs
- Use a stencil
- Create an ombre or two-toned effect
If you’re not sure how to paint a picture frame, simply follow our guide for painting both wood and metal frames.
Don’t Leave an Empty Frame Empty
If your gift is the frame itself, don’t leave it completely empty — frame something temporarily. For example, you could frame a hand-written note instead of a card or even create a fun, personalized postcard. If you have a child, have them draw a special picture. This way, you can show them the frame the way it will look when their own artwork is added.
You can also frame something else just for the fun of it, such as a sheet of stickers, a cartoon clipping or even a photo of their favorite celebrity.
Frame Your Gift
You can include a picture frame as a little something extra even if it isn’t directly part of the gift, especially if they can use the frame later to commemorate the gift they received. For example, frame that pair of concert tickets you’re surprising them with — and then take a picture at the event to frame later. You can frame anything relatively small and flat, such as lottery tickets, a gift card or even some money.
A framed photo is a timeless, personal gift: you’re giving the recipient something you know they will appreciate, whether it’s a photo of someone they love, artwork you specifically selected, or even an empty frame to enclose a recently earned diploma. Make the gift even more personal with your own special flair, commemorating the occasion […]
Most framing projects are simple, with a flat print that slides easily into one of our easy-to-assemble canvas frames. With certain pieces of artwork, however, it may take extra components and just a little bit more time — especially when you’ve bought a one-of-a-kind painting or specialty canvas print.
Introduction to Canvas Prints and Paintings
Canvas is a type of woven fabric upon which artists can paint or, more recently, print with specialty printers. There are two ways to purchase them: stretched onto a wooden frame or rolled. Canvases on stretcher bars require another frame, either a standard wood or metal picture frame or even canvas floater frames to finish the piece, while rolled canvas must first be stretched and placed into these wooden stretcher bars before they are framed.
How to Frame Rolled Canvas
There are different reasons someone might purchase a rolled canvas print instead of one that’s already been stretched onto a frame. You may pay less money for a rolled canvas, or you may prefer to have the canvas stretched just prior to framing to ensure it doesn’t loosen. Other times, it’s the only option available.
If you’ve purchased a rolled canvas print or painting, you’ll need to stretch the canvas before framing it. Note that rolled canvas paintings should actually be rolled with the paint on the outside, which may seem counterintuitive; however, this puts less stress on the paint and reduces the chances of cracking.
To frame a rolled canvas, you’ll need a few extra items:
- Stretcher bar frame
- Staple gun
- Canvas pliers (optional)
- Wood, metal or floater frame
- Glazing (optional)
Step 1: Measure The Height and Width
First, you’ll need to measure the height and width of your canvas to see what frame size you’ll need. Make sure to leave enough canvas to fold and staple to the stretcher bar. If you need to cut the canvas because there is an excess that makes folding impossible or bulky, leave at least two inches of canvas to fold over and stretch.
TIP: Use shorter stretcher bars if you’d like to use a wood frame. If you’re using a floater frame, read our guide to pairing canvas floater frames with stretcher bars to find the right size.
Step 2: Place Canvas Face down on Clean Surface
Place your canvas face down on a clean surface. To ensure that the canvas is placed evenly, measure the distance between the corners; they should be the same.
Step 3: Fold the Canvas
Starting on one of the shorter sides of the canvas, fold one side of the “extra” canvas over the stretcher bar and use the canvas pliers to hold it in place. If you’re not using canvas pliers, you can simply begin stapling. Staple once in the middle of the folded piece of canvas.
Step 4: Turn Over and Repeat
Turn the canvas to the opposite side (turning 180 degrees) and repeat the folding and stapling step until all sides are done.
Step 5: Pull the Canvas
Once each side of the frame have a single staple, pull the canvas slightly — not too much, or your canvas won’t be able to shrink or expand — and add a staple on either side of the middle one, spaced evenly apart.
Step 6: Fold the Corners
Fold the corners by tucking one side under the other, making sure that you are pulling tightly. Cut the tip of the corner before folding down and then staple it to the frame.
Step 7: Place in Final Frame
Once your canvas is stretched, you can place it into its final frame.

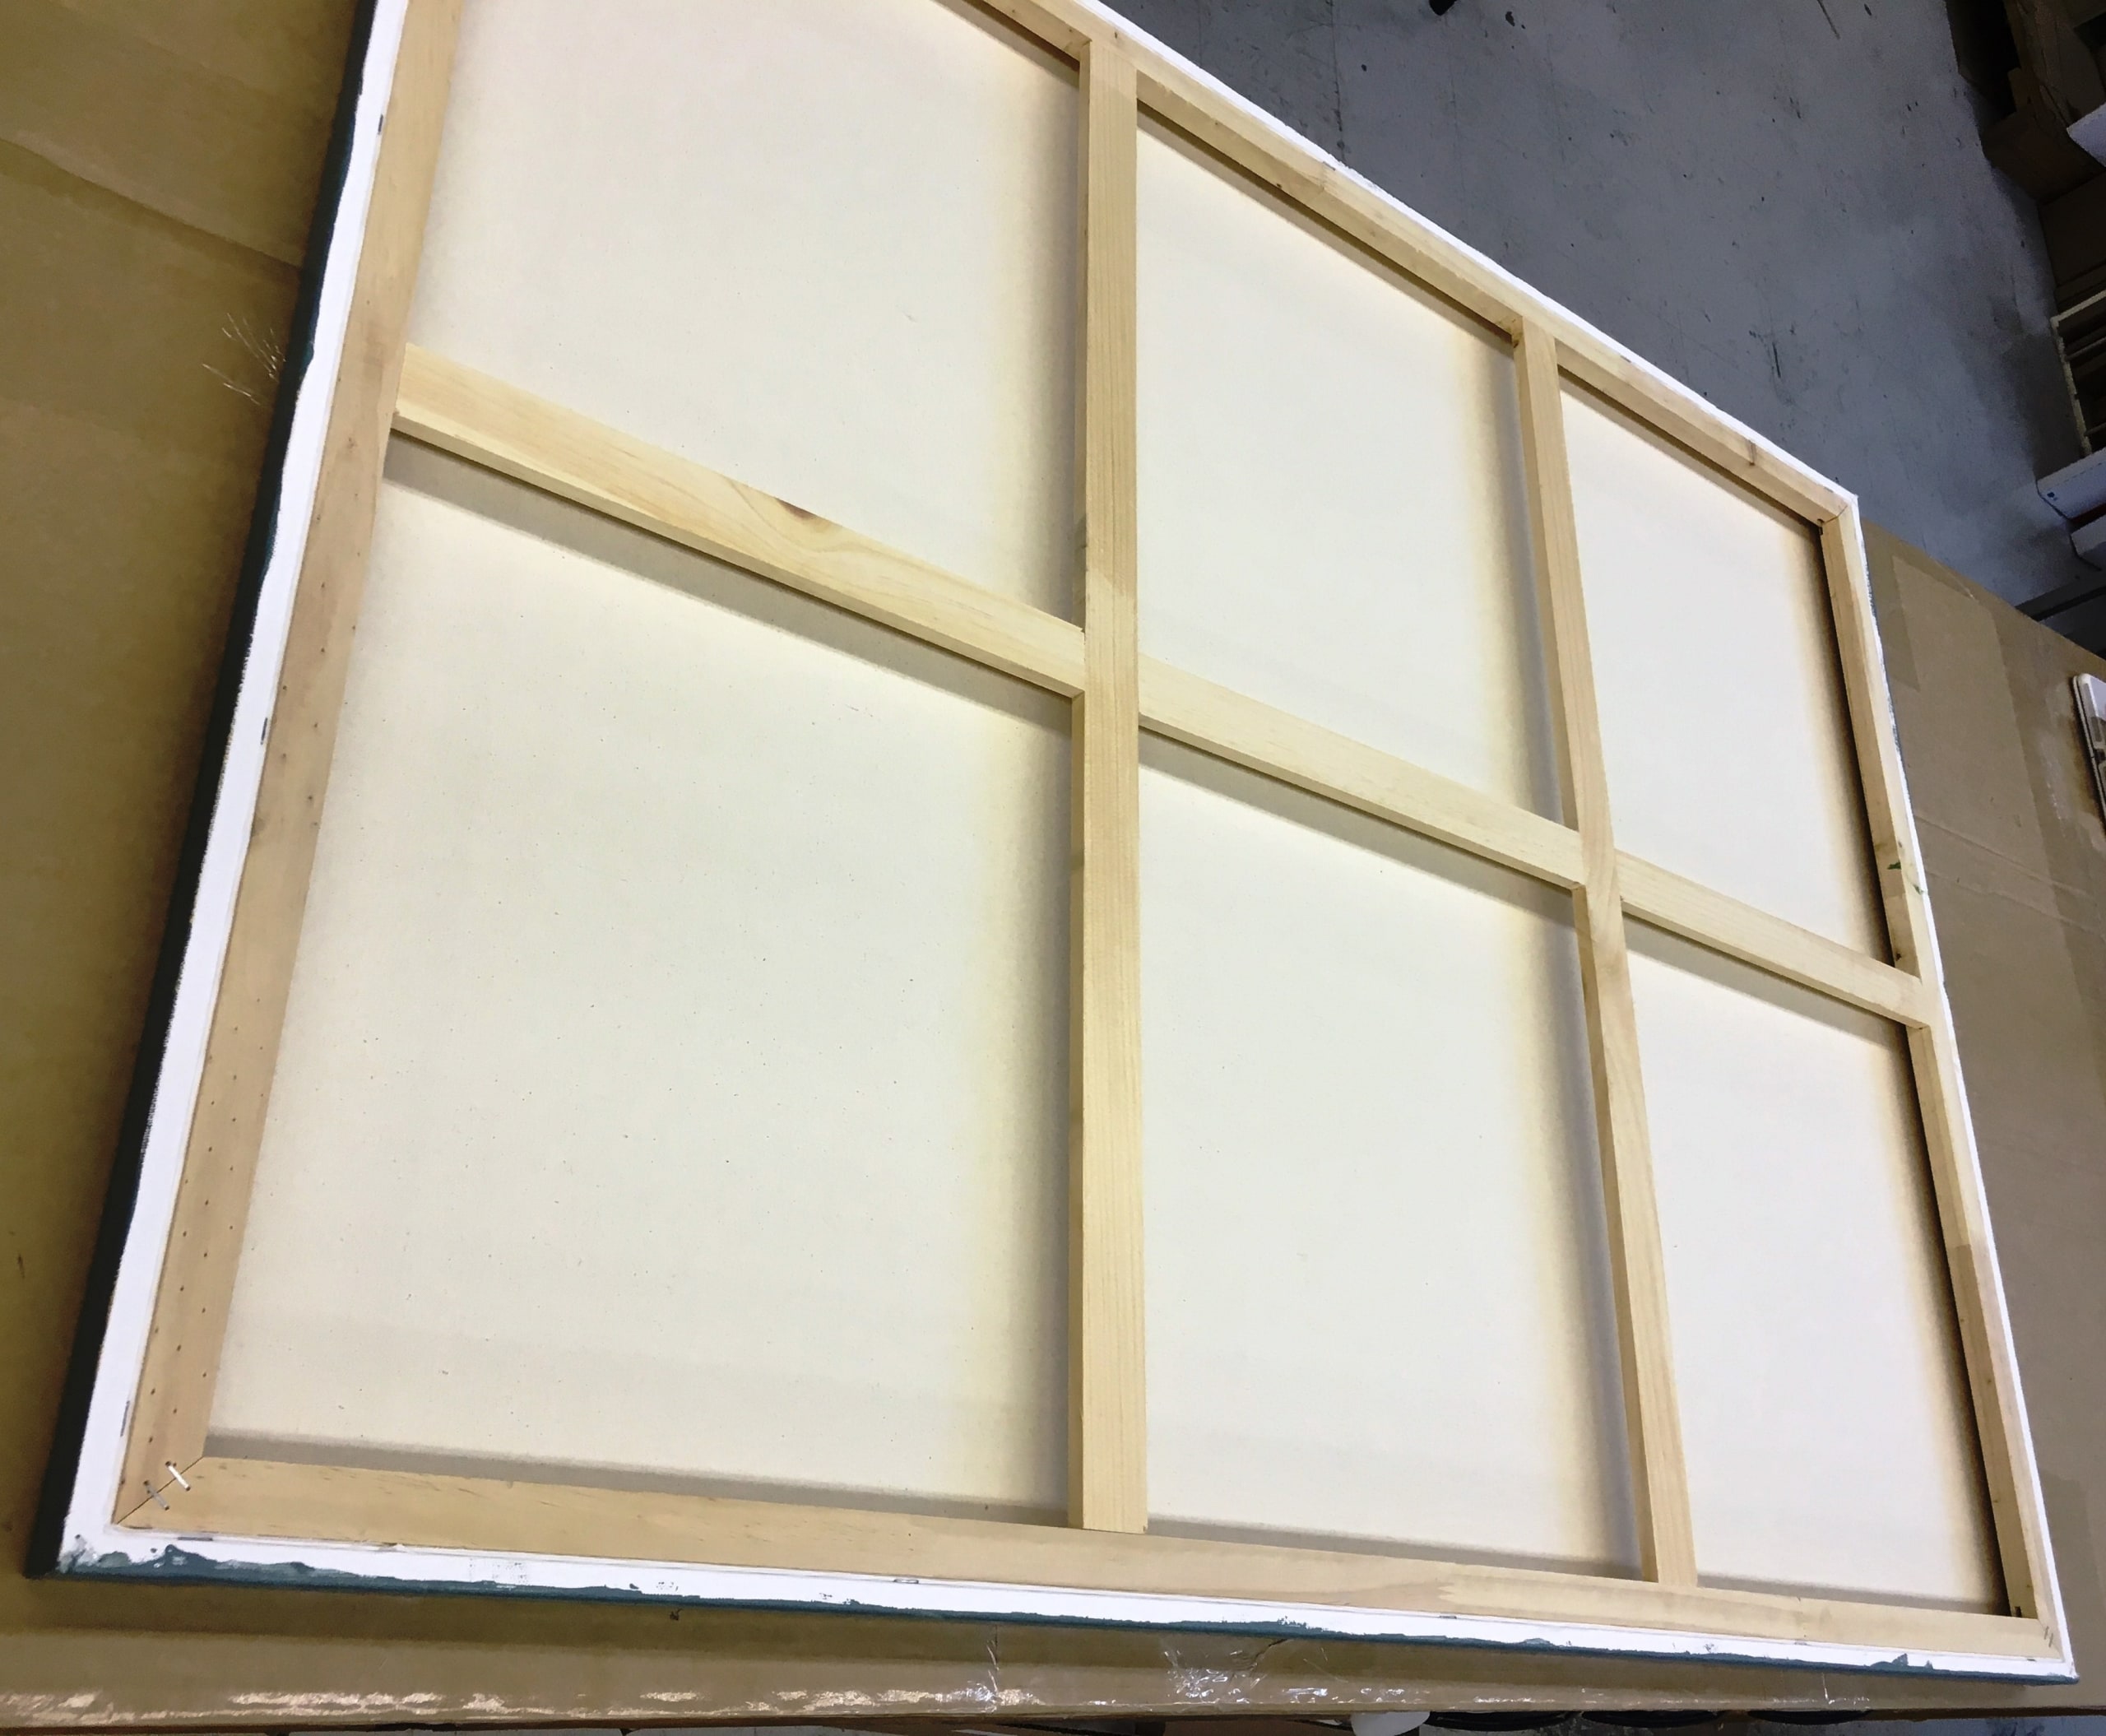
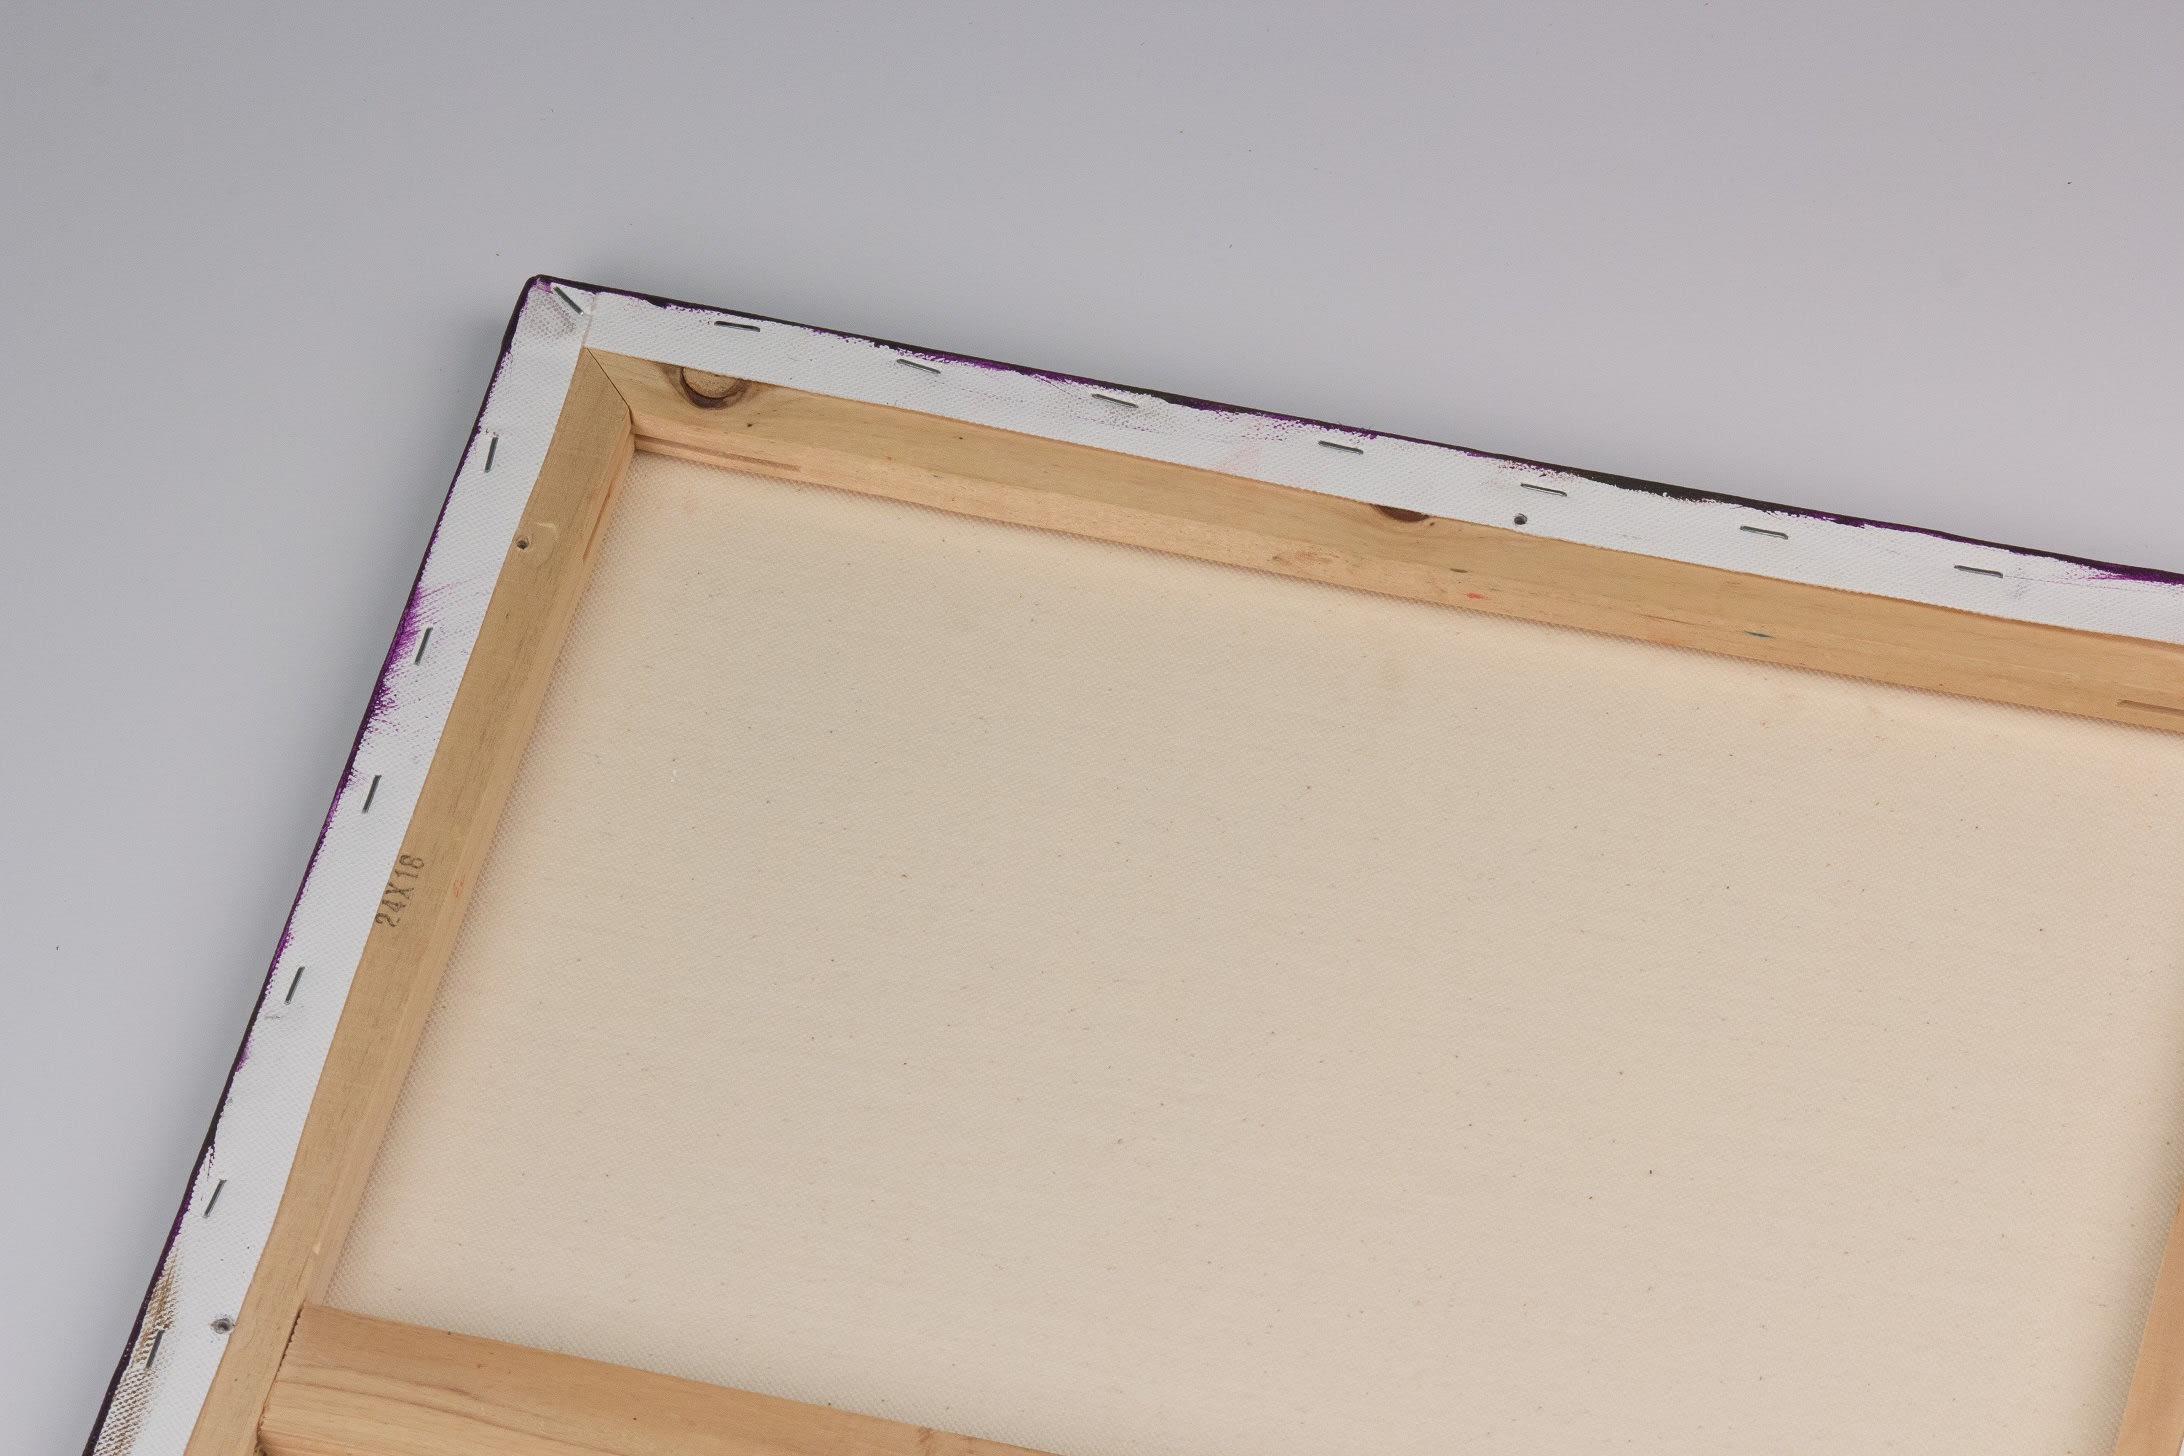
A canvas stretched over stretcher bars.
Framing Stretched Canvas Prints and Paintings
When framing a canvas print that’s already been stretched onto stretcher bars, you’ll have less work to do — but you may need help choosing the right frame!
You can choose a wood picture frame, metal frame or floater frame for stretched canvas artwork, the latter of which is made especially for canvases. For all types of frames, it is important to make sure that the rabbet of the frame is larger than the thickness of the stretcher bar so that the artwork fits properly within it. A wood frame with a rabbet that is too small will force the artwork away from the wall; with a metal frame, you simply will not be able to slide the canvas inside.
Most pre-stretched canvases are one of three thicknesses: 5/8”, 3/4”, and 1 1/2'”. Frame Destination carries a number of wood and metal frames suitable for these standard sizes
| 5/8" | 3/4" | 1-1/2" | 1-3/4" | 2" | |
|---|---|---|---|---|---|
| Wood Frames | |||||
| 310 | x | x | |||
| 502 | x | x | |||
| 503 | x | x | |||
| 513 | x | x | |||
| 851 | x | x | |||
| 865 | x | x | |||
| 880 | x | x | |||
| S24 | x | x | |||
| S30 | x | x | |||
| 532 | x | x | |||
| 728 | x | x | |||
| Metal Frames | |||||
| 117 | x | x | |||
| 117A | x | x | |||
| 117V | x | x | |||
| 94 | x | ||||
| 95 | x | x | |||
| 127 | x | ||||
| 34 | x | ||||
| 35 | x | x | x | ||
| 37 | x | ||||
| 22 | x | x | |||
| Floater Frames | |||||
| F120 | x | x | |||
| F140 | x | x | |||
| F306 | x | x | |||
| F361 | x | x | |||
| M013 | x | x | |||
| M014 | x | ||||
| F797 | x | x | |||
| F530 | x | x | x | ||
If you choose a wood frame with a rabbet larger than the canvas, order points with your frame at the required depth. If you choose a metal frame that has a much deeper rabbet than your canvas print’s stretcher bar, you may need to use spring clips to hold it in place. Canvas floater frames from Frame Destination come with offset clips, which are available in two depths.
Note: If you’d like to frame your canvas print as if it were a picture within a picture frame, it’s possible! Select a frame with a rabbet deep enough for your stretched canvas, You can also switch the offset clips around and have the back of the canvas actually be the back of the framed piece.
Buying canvas prints and paintings, whether rolled or pre-stretched onto stretcher bars, can add significant sophistication to your home or office decor — and the right frame only enhances it.
Last Updated January 3, 2022
Framing Canvas Prints and Paintings
Canvas is a type of woven fabric upon which artists can paint or, more recently, print with specialty printers. There are two ways to purchase them: stretched onto a wooden frame or rolled. Canvases on stretcher bars require another frame, either a standard wood or metal picture frame or even floater frames to finish the piece, while a rolled painting or print must first be stretched and placed into these wooden stretcher bars before they are framed.
How to Frame Canvases in 7 Steps
- Measure The Height and Width
- Place Canvas Face down on Clean Surface
- Fold the Canvas
- Turn Over and Repeat
- Pull the Canvas
- Fold the Corners
- Place in Final Frame
Materials You'll Need
Wood glue, nail gun, frame pieces, wood stain (optional if using your own DIY frame), hanger wire, tape measure and some patience.
Step 1: Measure The Height and Width
First, you’ll need to measure the height and width to see what frame size you’ll need. Make sure to leave enough canvas to fold and staple to the stretcher bar. If you need to cut the canvas because there is an excess that makes folding impossible or bulky, leave at least two inches to fold over and stretch.
TIP: Use shorter stretcher bars if you’d like to use a wood frame. If you’re using a floater frame, read our guide to pairing floater frames with stretcher bars to find the right size.
Step 2: Place Canvas Face down on Clean Surface
Place your canvas face down on a clean surface. To ensure that the canvas is placed evenly, measure the distance between the corners; they should be the same.
Step 3: Fold the Canvas
Starting on one of the shorter sides of the canvas, fold one side of the “extra” canvas over the stretcher bar and use the canvas pliers to hold it in place. If you’re not using canvas pliers, you can simply begin stapling. Staple once in the middle of the folded piece of canvas.
Step 4: Turn Over and Repeat
Turn the canvas to the opposite side (turning 180 degrees) and repeat the folding and stapling step until all sides are done.
Step 5: Pull the Canvas
Once each side of the frame have a single staple, pull the canvas slightly — not too much, or your canvas won’t be able to shrink or expand — and add a staple on either side of the middle one, spaced evenly apart.
Step 6: Fold the Corners
Fold the corners by tucking one side under the other, making sure that you are pulling tightly. Cut the tip of the corner before folding down and then staple it to the frame.
Step 7: Place in Final Frame
Once your canvas is stretched, you can place it into its final frame.
How to Frame Canvas Art That's Rolled
There are different reasons someone might purchase a rolled print (aka unstretched canvas) instead of one that’s already been stretched onto a frame. You may pay less money for a rolled canvas piece, or you may prefer to have the material stretched just prior to framing to ensure it doesn’t loosen. Other times, it’s the only option available.
If you’ve purchased a rolled canvas print or painting, you’ll need to stretch the canvas before framing it. Note that a rolled painting should actually be rolled with the paint on the outside, which may seem counterintuitive; however, this puts less stress on the paint and reduces the chances of cracking.
To frame a rolled print or piece of art, you’ll need a few extra items:
- Stretcher bar frame
- Staple or nail gun
- Canvas pliers (optional)
- Wood, metal or floater frame
- Glazing aka framing glass (optional)
Frequently Asked Questions
Can you frame a canvas in a floating frame?
Yes you can. To frame a canvas in a floating frame, you will need a frame that is slightly larger than the canvas. You can then attach the canvas to the frame using clips or screws, leaving a small gap between the canvas and the frame. This will create the illusion that the canvas is floating within the frame.
What is the best way to frame a canvas print?
The best way to frame a canvas depends on your personal preferences and the style of the artwork. Some popular options include floating frames, traditional frames with a mat, and simple frames without a mat. Consider the style and colors of the artwork when choosing a frame.
How do you frame a canvas at home?
To frame a canvas at home, you will need a frame that is slightly larger than the canvas, a mat (optional), and mounting materials such as screws or clips. You can then attach the canvas to the frame and add a mat if desired. Be sure to use acid-free materials to protect the artwork.
What is the best frame for a canvas painting?
The best frame for a canvas painting depends on the style and colors of the artwork. A simple frame without a mat can work well for modern or minimalist artwork, while a traditional frame with a mat can add elegance to a more classic piece. Consider the overall look and feel of the artwork when choosing a frame.
How to frame a canvas print?
To frame a rolled canvas print, you will need to first stretch the canvas onto a wooden frame. Once the canvas is stretched, you can then choose a frame that is slightly larger than the canvas and attach the canvas to the custom art frame using clips or screws. Be sure to use acid-free materials to protect the artwork.
Written by Mark Rogers
 Mark Rogers is the President and Co-Founder of Frame Destination. With over 20 years of experience in the field, Mark has become a leading authority on framing techniques and best practices, and has earned a reputation for his innovative approaches to custom framing and frame services for photographers and artists.
Most framing projects are simple, with a flat print that slides easily into one of our easy-to-assemble canvas frames. With certain pieces of artwork, however, it may take extra components and just a little bit more time — especially when you’ve bought a one-of-a-kind painting or specialty canvas print. Introduction to Canvas Prints and Paintings […]
We understand that choosing where to hang your favorite pieces of artwork in your home or office can be difficult, not because you can’t decide where to display them — but because you don’t want to put too many holes in the walls. We’re here to help.
Though each complete picture frame from Frame Destination comes with a complimentary hanging kit and instructions — and we even offer a Picture Hanging Tool to help with the job — you’re not obligated to hang your frames. If you’re living in a rental home or just want to avoid holes in your own walls, you can find creative ways to hang frames without nails.
Option 1: Use Picture Hanging Strips
One of the most popular ways to hang picture frames without nails is to use picture hanging strips. These specialty strips contain a pressure-sensitive adhesive that holds until you’re ready to remove it, leaving no residue or damage. Each strip comes in two parts: one that adheres to the frame and one that adheres to the wall.
To ensure that these strips hold up the frame, it’s important to use the right strips for your frame’s size and weight. The largest picture hanging strip available from the most popular brand, 3M’s Command™ line, can hold up picture frames measuring 24x36 and weighing five pounds; the smallest can hold most 8x10 picture frames that weigh about one pound.
The most important part of using picture hanging strips is to follow the manufacturer’s instructions, such as cleaning the wall with isopropyl (rubbing) alcohol only and waiting an hour before attaching the frame. Once you’re ready to remove (and perhaps do a little frame rearranging), simply stretch the adhesive downwards until it releases.
Option 2: Hang Pictures From the Ceiling
If you’re living in an older home, look up: you may have a built-in picture frame hanging system. Picture rails, a type of molding usually placed below the crown molding or a foot from the ceiling, were common in 19th- and early 20th-century homes but have since fallen out of favor. However, your home may still feature these unique moldings. To use them, you’ll need additional picture wire and picture rail hooks that fit the molding.
There are a few ways to attach the wire to the picture frame, using one or two picture rail hooks:

If you’re good with tools, you can also install a picture rail in your home. This breaks the “no nails” rule, but the holes will be high on the wall and covered by the molding, which is less likely to be removed than a picture frame. Some picture rails, also called gallery rails, are more modern and have built-in hooks that make hanging picture frames much easier.
Option 3: Go for the Lean Look

Photo by Christopher Burns
Picture frames don’t necessarily have to be hung anywhere at all — you can prop them up against the wall for a more casual look. When leaning artwork, make sure that you cluster a few differently-sized picture frames around each other. Too many frames of the same size may unintentionally appear as though you simply never got around to hanging them.
You can use the same style picture frame, such as a series of ready-made metal picture frames, to evoke an elegant yet still relaxed ambience, but you can also alternate wood picture frames and metal frames in different colors and styles for an eclectic feel.
Use any of the surfaces around your home: shelves, bookcases, countertops, fireplace mantels, the tops of door and window frames, and even on the floor for exceptionally large pieces. The best part of leaning artwork is that you can play around with the location of the frames as much as you want, making your décor very versatile.
Regardless of the reason you have for avoiding holes or the use of a hammer and nails, these options would all show off your art beautifully. If you have artwork that is hung traditionally, check out our tips on avoiding those slants and tilts in How to Keep Picture Frames Straight.
We understand that choosing where to hang your favorite pieces of artwork in your home or office can be difficult, not because you can’t decide where to display them — but because you don’t want to put too many holes in the walls. We’re here to help. Though each complete picture frame from Frame Destination […]
If you’re having a tough time picking your favorite photo to display, there’s an easy solution: make a collage! Instead of cutting photos and taping them together, which damages them in the process, step up your craft game and create a collage that doesn’t look like it belongs in a college dorm.
Picture Frame Collage Option #1: One Frame, Many Photos
Create a collage using a single picture frame and mat board to create a clean, modern collage. You’ll need just a few items:
- Picture frame, wood or metal
- Mount board
- Mat board, full uncut sheet or cut to size
- Glass or acrylic glazing
- Mat cutter (if cutting your own mat board)
- Straight-edge ruler
- Pencil
- Mounting supplies, such as hinging tape or photo strips
First, you’ll need to choose the photos. The size of the frame and mat board will depend on how many photos you choose, and frames only run so large — at Frame Destination, the largest frame sizes include 30x40, 36x36 and 32x38.
The best way to determine how many photos to use as well as the size of the frame is to measure it all out. Cut out a piece of cardboard to represent the size of the frame and place your chosen photos on top of it. Because you will be using mat board, photos shouldn’t overlap; in fact, there should be at least a half-inch of space between the photos. Use a straight-edge and a pencil to mark their locations.
If you’ve purchased a full, uncut sheet of mat board, you’ll need to cut your own mat board. Note that you’ll need a mat cutter to do this correctly, as mat board is thicker than paper and even the sharpest knife will most likely result in jagged, uneven edges without the typical beveled edge.
Alternatively, order a mat board cut with multiple openings from Frame Destination. Using the template you created when laying out your design, simply create a digital image that shows the orientation of the openings and their dimensions. We cut mat openings exactly to size, resulting in a clean, custom-made collage mat board. When in doubt, contact Frame Destination to make sure your custom mat board is cut correctly.
Once you receive your frame, custom mat board, mount board and other materials, use your mounting supplies to attach the photos to the mat board. Place all the materials inside the frame and you’re ready to frame your elegant collage.
Picture Frame Collage Option #2: Many Frames, Many Photos
Instead of one picture frame with many photographs, you can create a collage with multiple frames. This project has a little bit more DIY involved, but the result is a completely unique creation. You’ll need:
- Multiple wood picture frames of various sizes
- Mount board
- Mat board (optional)
- Glass or acrylic glazing
- Wood glue
- Clamps or hot glue
You can create a collage with as many picture frames as you like in just as many designs. Select the photos you’d like to include in the collage and purchase the same number of frames. To ensure that your collage has visual interest, include both horizontal and vertical prints to frame.
Remove all the contents of the picture frames and arrange them in your chosen design: you can use a large frame as the focal point and arrange smaller frames around them, or you can create a pattern, such as alternating vertical and horizontal frames. Play around with the photos before ordering the frames to make sure you’re happy with the look.
Start gluing the empty frames together, either side-by-side or on top of one another for a three-dimensional look. Clamp the frames together so that the glue adheres; if you don’t have clamps, hot glue can also be used to hold the pieces together as the wood glue dries. Once the glue has dried, start inserting the mounted photos, glazing and mat board, if you’ve decided to use it.
Picture frame collages allow you to show off your favorite photos as one unit, creating a unique design piece for your home. Whether you want to create a seasonal collage for holiday displays or one that commemorates your family’s favorite holidays, a collage can be the décor piece that becomes a focal point of your home.
If you’re having a tough time picking your favorite photo to display, there’s an easy solution: make a collage! Instead of cutting photos and taping them together, which damages them in the process, step up your craft game and create a collage that doesn’t look like it belongs in a college dorm. Picture Frame Collage […]
Summer brings with it a multitude of blooming flowers. Fields of sunflowers reach toward the sky while hydrangeas fill the bushes. Capture the color and beauty of nature and bring it into your home this season by pressing flowers and making them into a DIY botanical print.
FTD walks you through how to press flowers four different ways, depending on what supplies you have on hand. From there, embrace the metallic trend and frame the pressed flowers in a metallic frame for a trendy piece of decor.
This easy DIY will help you create a piece of decor that is unique to your home. It’s also versatile. If you like to change your decor based on the season, swap out the flowers for a new seasonal flower design each month.
How to create a DIY botanical print
Materials:
- Pressed flowers
- Glass frame
- Paper towel
Step 1: Clean your frame.

Make sure the glass frame is spotless before using it. Remove the backing and wipe it down with a damp paper towel. Avoid using a cleaning solution because it may react with the pressed flowers and ruin them. Let the frame dry completely before using.
Step 2: Create a design with your pressed flowers.

This is where you get to be creative! There are endless possibilities when it comes to framing flowers. Try a unique pattern or a cute shape like a heart. You can decide to use just the flower buds or keep the stem for a more natural look. Make sure the flowers are facing down when you arrange them in the frame.
Step 3: Carefully return the back to the frame.

Place the back on the frame, taking care not to move your flower pattern. Secure the back. If the flowers aren’t in their desired place, remove the back and adjust them until perfect.
Step 4: Display for everyone to admire!

You’ve created a piece of decor that no one else has. Put this unique piece on display in your home or give it as a gift to someone who loves flowers as much as you do.
Pressed flowers can be used in many ways. From botanical prints to crafting cards, they add a unique touch to whatever they are included in. Try adding pressed flowers to a thank you gift to show the recipient how grateful you are.
To make things even easier for you, we’ve created a shareable how-to guide so that you can visualize the process. If you find it helpful, save our guide on how to create a botanical print and share it with your friends and family.

This post originally appeared at FTD by Design.
Summer brings with it a multitude of blooming flowers. Fields of sunflowers reach toward the sky while hydrangeas fill the bushes. Capture the color and beauty of nature and bring it into your home this season by pressing flowers and making them into a DIY botanical print. FTD walks you through how to press flowers […]
Light is artwork’s greatest friend, allowing us to view and appreciate art, but it is also its greatest foe: it can cause serious, irreversible damage to any type of unprotected artwork. The glass and art preservation industries have developed countless products to protect these precious pieces from light while still allowing us to display art, including UV-filtering glass.
What Is UV Light?
UV light is part of the electromagnetic spectrum, of which visible light (i.e. the light we can see) is also part. We cannot see UV light, and it features shorter wavelengths than visible light and therefore more energy.
This powerful light breaks down the chemical bonds that allow us to see the color of an object, which causes the color to fade. This is only one outcome of photodegradation, the term for damage caused by light; others include embrittlement, yellowing and disintegration. Artwork is particularly susceptible to photodegradation, considering it often uses materials that are quickly damaged by light such as dye and paper.
Protecting Against UV Light: Picture Frames
Standard glass (most commonly soda lime glass, which is used for both windows and picture frame glazing) actually provides some UV protection, absorbing about 97% of UVB rays; however, UVA rays, which also cause damage, can still penetrate the glass.
To qualify as “providing UV protection” by the Professional Picture Framers Association (PPFA), the UV filter must be able to block at least 97% of all UV rays, including UVA and UVB. There is no single method to ensure that picture framing glass protects against UV light, and different manufacturers of glass have come up with their own proprietary coatings and techniques.
Laminated glass, a type of safety glass used commonly for car windshields, is like a glass sandwich: it uses sheets of glass with an interlayer made of various materials, most commonly polyvinyl butyral (PVB). According to one study, this type of laminated glass completely blocks both UVA and UVB radiation. Laminated glass is less common in picture framing due to its considerable weight and cost, but there are certain manufacturers such as Tru-Vue that carry this type of glass for particularly valuable items.
Other types of UV glass feature a special coating that either filters, or blocks, the UV light or absorbs the UV light. A coating that filters UV light does not allow UV rays to enter the glass, while UV filters that absorb light effectively “trap” it before it gets to the artwork underneath. Artglass, for example, uses a UV-blocking molecular film that blocks over 90% of UV light, depending on the model. UV protection on glass use coatings like the above; with UV-filtering acrylic, the protection is built in.
Frame Destination carries several types of UV-filtering glazing:
- Artglass 99 UV-Filter, blocking 99% of UV light
- Artglass AR92 Water White Anti-Reflective UV Glass, blocking 92% of UV light
- UV Filter Acrylic, blocking 98% of UV rays
- UV Filter/Non-Glare Acrylic, blocking 92% of UV light
Neither is “better” than the other, and the quality of the framing glass depends on many more factors than the mechanism of UV filtering, such as its clarity and any anti-reflective properties. The only surefire way to protect artwork from UV light is to store it in archival photo storage boxes and display a framed copy, as even glazing that filters 99% of UV light cannot completely stop degradation.
To best protect your possessions but still display your artwork, choose a suitable UV-filter glass and rotate out the pieces you display every few months, making sure that no paintings, prints and photographs are hanging in direct sunlight.
Light is artwork’s greatest friend, allowing us to view and appreciate art, but it is also its greatest foe: it can cause serious, irreversible damage to any type of unprotected artwork. The glass and art preservation industries have developed countless products to protect these precious pieces from light while still allowing us to display art, […]